Before creating any lease agreements, you must have created a relevant Entity, Counterparty, Portfolio, Cost Center, Bank Accounts and Lease Types.Lease types are explained in a separate document titled "Adding a lease type".
Please note that new lease agreements can be imported from excel, created manually or just by copying an existing one. Following these steps, you can proceed with creating a lease agreement.
Excel import of leases
Navigate to ‘Import’ from the top right corner and choose ‘Lease’. Following this step, from the ‘Download sample’, you can get the import excel template that you can use for the import.

All mandatory fields in the excel file are marked with green background, so you can easily seen which are the columns that need input.
In the template, you should find all important fields related to a lease agreement. It is important that all data is named exactly the same way in excel as it is in the system.
You can bring 100 lease agreements at once. It is always good to check a couple of lease after the import. Don’t forget to check the date formats to make sure they are correct.
Click upload, check and after receiving “The File is ready to Import!” message click import. You will now get notification “ Lease import succeeded” to ensure the import is complete.
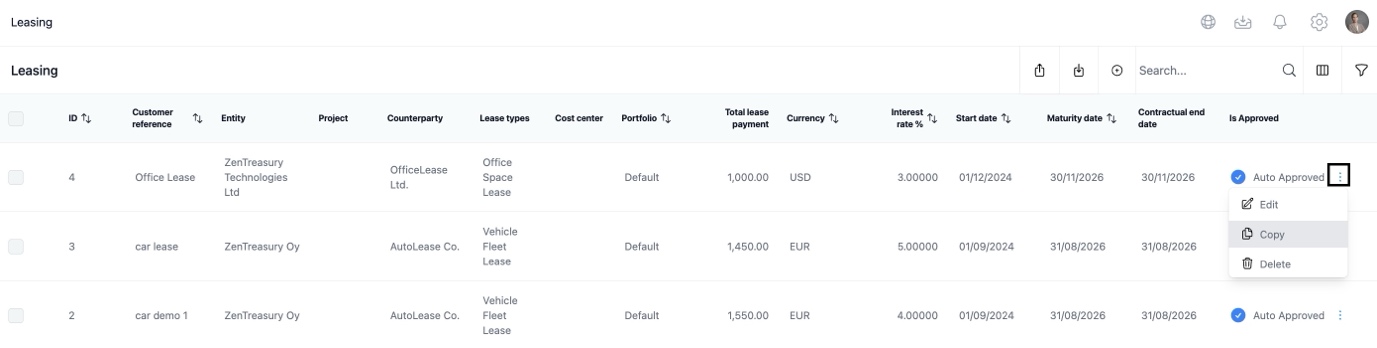
Copying a lease agreement
When you copy a lease agreement, please note that you’ll be copying the basic information of the underlying agreement. After checking that everything is fine, you need to create the lease flows for the copied lease. The process is further explained in the lines below.
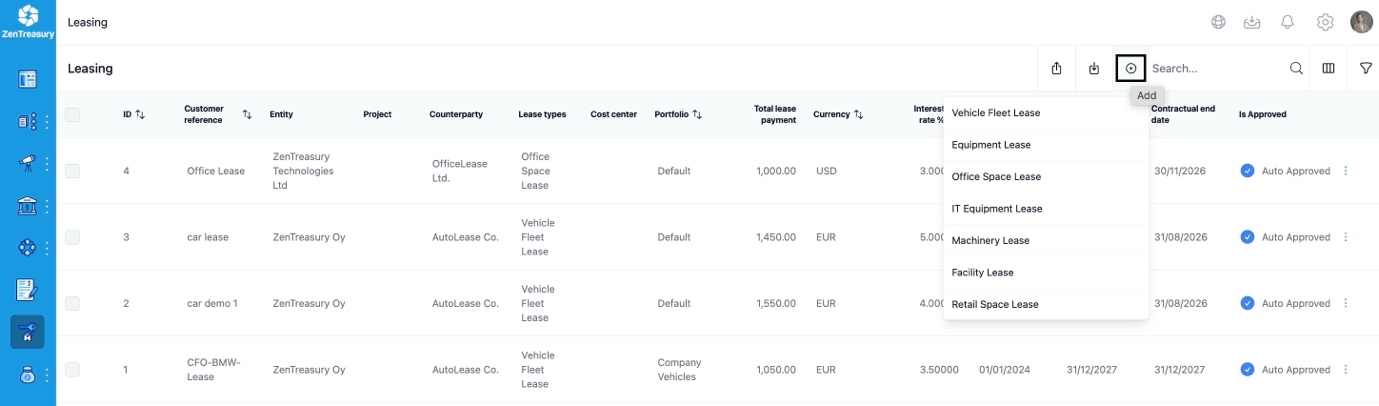
Creating a lease agreement manually
Click on Leasing and ‘Add new’. The dropdow menu gives you an option to select a specific lease type. Select the one that best suits the asset group the lease belongs to.
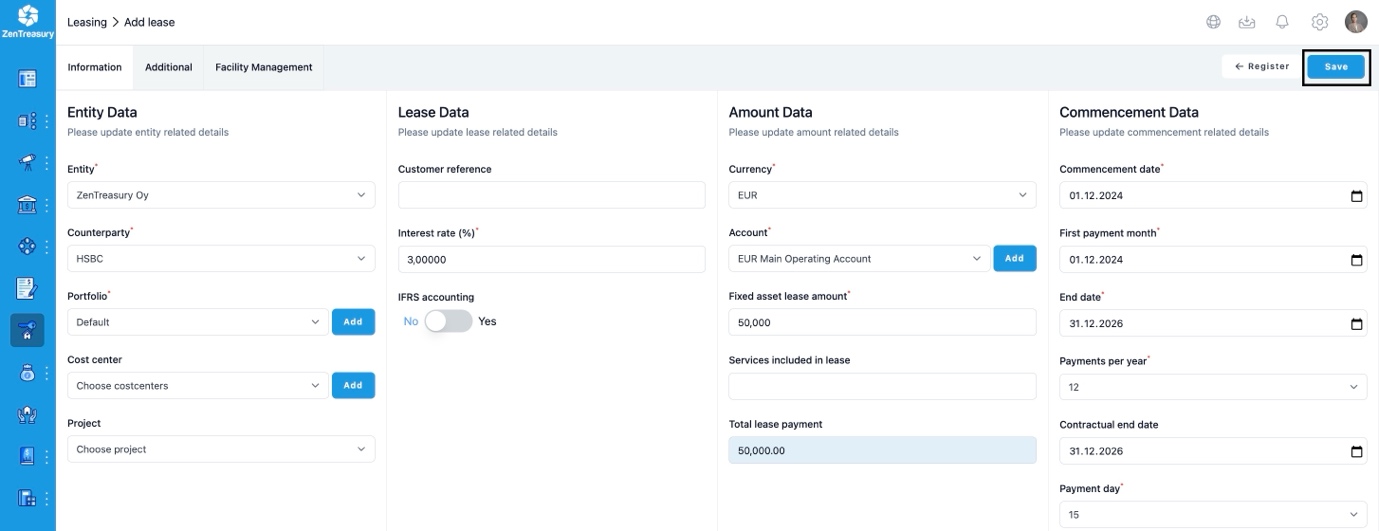
Update all fields that are relevant to your lease. All mandatory fields are marked with the red asterisk (*)
1) Entity is the Lesses of the agreement.
2) Counterparty is the Lessor.
3) Portfolio, Cost center and Project selection helps to categorise your data in reports.
4) Lease Data input allows you to fill in the ‘Customer reference’ and ‘Interest rate %’ for your lease agreement.
The IFRS accounting tick box is activated if you want to do IFRS16 accounting for this particular lease.
5) Amount Data relates to ‘Currency’, ‘Account’ and ‘Fixed asset lease amount’. The Fixed asset lease amount is the share of your lease cost that is directly linked to a fixed asset. Once you have selected a Currency, the system will provide you with a selection of appropriate bank accounts from the ‘Account’ drop down menu.
6) Add ‘Services included in lease’ amount, if you have them, and system will automatically calculate you the ‘Total lease payment amount’ (i.e. If your monthly lease cost is 1000€ and 100€ of that cost relates to maintenance, input will be 900€ and 100€).
7) Commencement date is the start date of the lease. The system will automatically change the Start date to the first day of the starting month.
8) First payment month is the month of the first payment after the Lease Start date. Select the date from the calendar. The system will automatically change the First payment date to the last day of the starting month.
9) End date is the end date of the lease. The system will automatically change the End date to the last day of the last month.
10) Select the number of Payments per year.
11) The Contractual end date is by default the same as the End date. If this is the case, it can also be left blank.
12) Payment day is used to automatically adjust your payment days for all payments.
13) Under ‘Lease Liability’ you can enter additional information that will have an effect on your lease liability:
‘Exercise price of a purchase option’, ‘Residual value guarantee’ and ‘Penalties for terminating the lease’.
If you input values here then you need to be certain that you will execute these at the end of your lease term. Your liability amount will show these values at the end of the lease term, which you then need to write off on your Balance Sheet containing these payments.
14) Under ‘Right-of-Use Asset’ you can enter additional values that have affect only on the Right-of-Use asset:
‘Lease payments made on or before start date’, ‘Initial direct cost’, ‘Estimated cost for dismantling restoring asset’ (you need to have the discounted value here if you have some costs for dismantling your asset at the end of the lease term), ‘Incentives Received and ‘Residual Value’ (if the Right-of-Use Asset should have a value at the end of the lease, you can enter it here).
Click ‘Save’ to save the new agreement.
Additional
You can add additional text to support the documentation of the agreement.
Usually ‘Move to archive’ before maturity and ‘Non accoutable' will both be unselected. Tick both these boxes if you would like to move a lease to archive before maturity and you don't want it to appear in your reports or accounting.
If you want the system to also calculate a valuation to the agreement, you can put the ‘Calculate valuation’ functionality on active mode. Based on the interest rate set to the instrument, you will get a market valuation to your lease agreement in the ‘Lease Valuation Report’.
By choosing ‘Cost center split’ on active mode, you make it possible to split this agreement between many cost centers that you have in the system. After activation, you will see a separate ‘Cost center split’ sheet in the agreement where you can specify the percentage split between the cost centers you choose.
The following text boxes are for accounting module users: Internal order, Tax and RoU asset number. You can save the text or number information to these, and then you can have them as one column in your accounting template for easy use when you import data into your ERP / Accounting system.
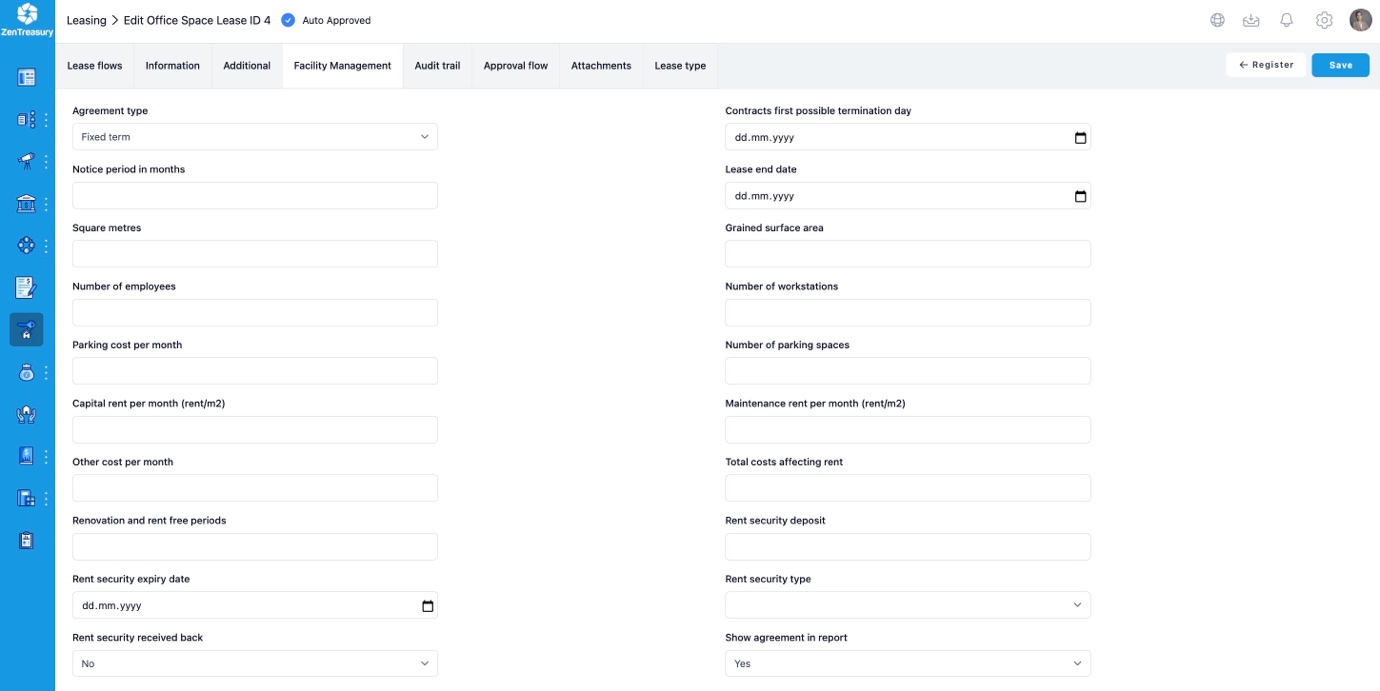
Facility management
This specific information input is set for Office or Retail facility leases.
Once the agreement is saved, you need to create the lease flows to have the numbers out of the agreement into reporting and accounting.
Generate Flows
Start by clicking ‘Lease flows’ tab and choosing 'Generate flows' from the clog wheel symbol.

If you have a lease with no special price increase conditions, simply check the automatically filled details for:
1) First payment month
2) Calculation start date
3) Fixed Asset Lease amount
4) Services included in lease and
5) End date.
If your lease contains Price increases, you can define this next.
First choose the Price increase interval. If, for example, the interval is yearly, insert 12.
Date of last payment with original value is the last day the month the initial payment is due (e.g. if your last payment with the initial lease payment value is in December 2024, input here should be 31.12.2024).
Input the ‘Negotiated Price Increase Amount’ or input the ‘Negotiated Price Increase Percentage’.
Following these steps, the next payment will appear with the increased amount.
Click ‘Save’ to create the lease flows.
If you are happy with the lease flow, click ‘Save’. Your lease flows are now seen under the lease agreement. If you would like to alter the details, click ‘Clear all' and delete the flows.

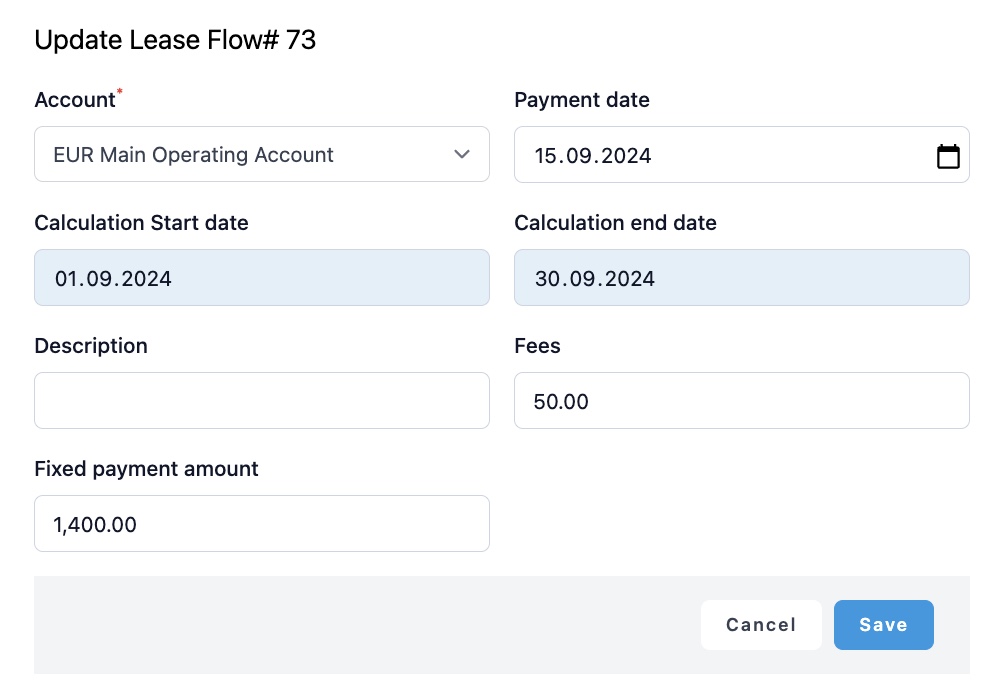
You can also modify each lease flow individually. Once the lease flow has been created you can go to the single flow by clicking the pen symbol. The last step is to modify the value details and click ‘Save’.

Lease changes
Lease changes are detailed in a separate support article titled "Lease Changes".
Audit trail
With the ‘Audit Trail’ functionality, you can save and track all the changes made to the lease agreement.
Approval flow
With the ‘Approval flow’ functionality, you can set the specific approval process for the lease agreement you have created.
Attachments
Here you can save documents in excel, pdf, jpg, jpeg and png up to 5MB. Characters a-z A-Z 1-9 or - _ are only allowed in attachment file names.
Lease type
This is the type selected for lease at the start of creating a lease agreement.
Was this article helpful?
That’s Great!
Thank you for your feedback
Sorry! We couldn't be helpful
Thank you for your feedback
Feedback sent
We appreciate your effort and will try to fix the article