Forecast One View is built to help you through forecasting process. It works similarly to Excel with its grid editor and allows you to insert large datasets at once while manually editing cells.
With this functionality you can:
1. Set forecast frequency and planning horizon (Admin only)
2. Create forecast types
3. Create forecasts for your company/entities
4. Generate recurring schedules (optional automation)
5. Edit/review your forecast with Forecast One View
6. Track your forecasting coverage
7. Set forecast frequensy and planning horizon (Admin only)
Before entering any forecast data, a company administrator must configure the core forecast setup via Settings > Admin Settings.
Forecast frequency options include:
1. Monthly, which is well suited for long-term budgeting and strategic cash flow analysis
2. Weekly, which is best for detailed liquidity planning operational control
This frequency defines how forecasts appear in Forecast One View where columns are either months or weeks). Active forecast range options are:
- Year-Month format (e.g., Aug 2025 - Jul 2026)
- Year-Week format (e.g., Week 31 of 2025 - Week 30 of 2026)
Please notice that these settings must be configured before any forecasts are created and that administrator can update the active forecasting period periodically via Admin Settings.
Step 1: Create forecast types
Forecast types help categorize your data. You can use types such as Sales Forecast, Accounts Receivables, Marketing Expenses, Rent and Payroll.
You can create and manage forecat types by navigating to Settings > Instruments Forecast type.
By clicking ‘Add’ you can define the forecast type name, and select Inflow or Outflow action for it. These types are used across entities and appear as grouping labels in reports and Forecast One View.
Step 2: Create forecast
With your forecast type in place, you can now create forecasts linked to a specific Entity and Forecast type by navigating to Cash forecasting > Forecast and choosing ‘Add’ from the plus icon and selecting the right forecast type.

You can proceed to saving your forecast after saving the fields:
- Entity
- Currency
- Account (auto-populated)
- Reference
- Portfolio
- Cost Center, Project and Forecasted payment day (optional)
Click ‘Save’ to register the forecast.
Step 3: Generate a payment schedule
You can also automate repeating cash flows like rent, salaries, or service fees. You can generate payment schedule by navigating to Forecasted flows tab on the forecast base that you have created in the previous step.

There you can define the details for your payment schedule by filing in:
- Calculation Start Date
- Amount
- Account
- Forecasted payments
- Forecasted payment day
- Forecasted payment month (optional)
- Calculation end date
Click ‘Generate’ to create the flows and populate the forecast grid.
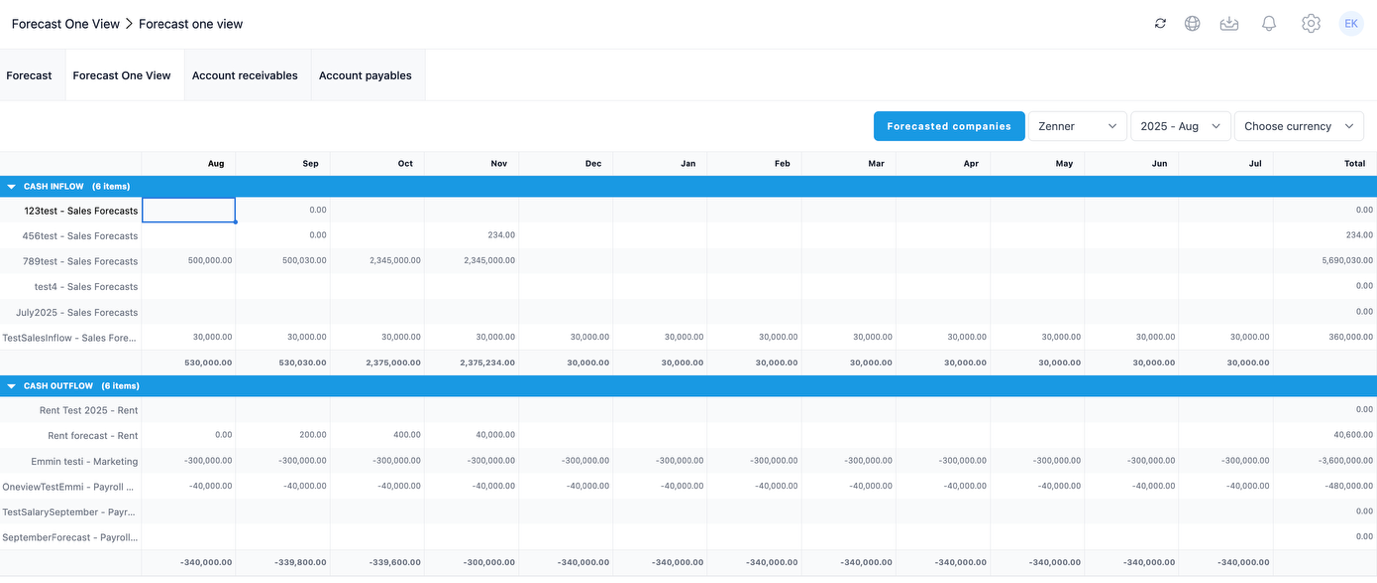
Step 4: Forecast One View
The Forecast One View is a central place to review, adjust, and bulk-edit forecasts. It provides you with the following functions:
- Displays all forecasts by Forecast type
- Groups generated flows into Cash Inflow and Cash Outflow
- Functions as Excel-style copy-paste field
- Auto-calculates totals
- Filters data by Entity, Currency and Period.
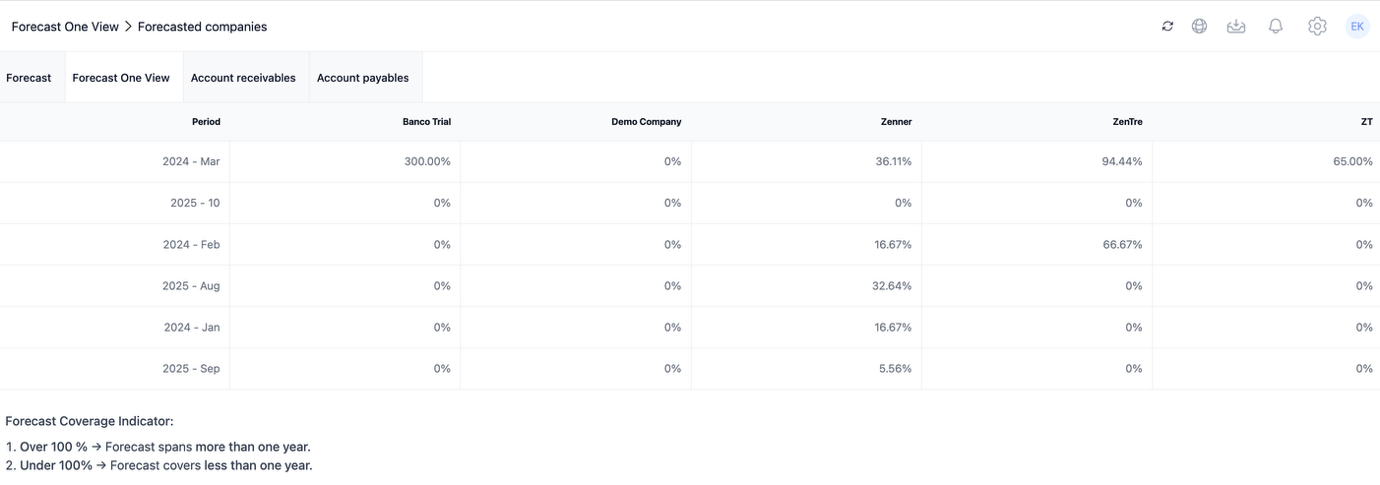
- Forecasted companies view for coverage monitoring
ZenTreasury provides a forecast coverage view to monitor the completeness of your forecasts. You can find it from Forecasting > Forecast One View > Forecasted companies.

It provides you with a view on companies readiness with forecast periods saved in the system showing you coverage % per entity.
Was this article helpful?
That’s Great!
Thank you for your feedback
Sorry! We couldn't be helpful
Thank you for your feedback
Feedback sent
We appreciate your effort and will try to fix the article